Recent Posts

How to Change a Pacman Package's Dependencies on Arch Linux with remakepkg

Recently I ran into a dependency conflict after an update of a particular package, bitwarden-cli. Prior to version 2022.6.2-2, bitwarden-cli depended on nodejs. It was in version 2022.6.2-2 that the dependency was changed from nodejs to nodejs-lts-gallium.

Okay, so what's the big deal? The big deal is that nodejs and nodejs-lts-gallium cannot both be installed, as they're listed as conflicting packages of one another (see the Conflicts section of nodejs-lts-gallium). While I could have just gone ahead and removed nodejs in favor of nodejs-lts-gallium, I didn't really want to, as I had no issues with it and wanted the latest version of nodejs. And yes, alternatively I could have installed the latest version via nvm or otherwise, and kept nodejs-lts-gallium (version 16.x at the time of this writing) as the system dependency.

For whatever your personal reasons are, you may wish to remove or alter the restrictions defined for a package by a package maintainer. In my case, I was able to figure out why the dependency change occurred in the first place. It was due to this bug, a bug which affected a premium feature of Bitwarden that I didn't even have access to. With this in mind, I felt comfortable discarding the new requirement of using nodejs-lts-gallium.

IMPORTANT NOTE
In writing this, I realized that --assume-installed nodejs-lts-gallium solves my problem, without the need for remakepkg. I just need to include that option during an upgrade, whenever there is a newer version of bitwarden-cli available. This works when dealing with the absence of a package. However, remakepkg may be needed for other scenarios. I'll proceed with how I used remakepkg to solve my problem.

So, how does one go about "changing" a package's dependency? It's done with the help of an AUR package, remakepkg. You can also find the git repo containing the script here.

Continue Reading

A Curl Helper Function for Easy API Testing

I tend to prefer command line tools for development, in this case choosing curl over Postman. Depending on the API that requests are being made to, curl commands can get out of hand, requiring numerous headers and other options to be manually attached on each request. The solution? Create a Bash helper function for curl, making our commands short and efficient.

The helper function:

function curls() {
  local response_code_and_method
  response_code_and_method=$(curl \
    --no-progress-meter \
    --write-out "%{response_code} %{method}" \
    --output /tmp/curls_body \
    --header "Content-Type: application/json" \
    ${CURL_OPTIONS[@]} \
    $CURL_BASE_URL/$@
  )

  if [ $? -eq 0 ]; then
    local pretty_json
    pretty_json=$(jq --color-output '.' /tmp/curls_body 2> /dev/null)
    if [ $? -eq 0 ]; then
      echo $pretty_json
    else
      cat /tmp/curls_body
      echo ""
    fi
    echo "\n$response_code_and_method"
  fi
}

In addition to providing a handful of "default" options to curl, we get some other benefits including:

  • Pretty printing JSON responses with jq (conditionally, when a response is parse-able as JSON)

  • Using ${CURL_OPTIONS[@]}, we can provide additional options through an environment variable. This may be preferred for temporarily adding additional options, rather than hard-coding them in our reusable Bash function.
    Further details on this option are shown below: Additional Notes

  • On the line $CURL_BASE_URL/$@, a variable representing the API's base URL is automatically inserted for us. This would be set to a value such as http://localhost:5000. A trailing slash / is appended, and our arguments provided to curls are inserted here with $@.

Continue Reading

React Hooks: How to Use useMemo

"In computing, memoization or memoisation is an optimization technique used primarily to speed up computer programs by storing the results of expensive function calls and returning the cached result when the same inputs occur again."
Memoization - Wikipedia

useMemo is a hook used to memoize values inside a React component. It's a performance optimization to avoid recalculating expensive values on every render. You might be familiar with React's memo function, which is similar, but is used to memoize React components themselves, to avoid said re-renders in the first place.

The TypeScript function signature of useMemo:

type useMemo = <T>(factory: () => T, deps: Array<any>) => T;

The first argument is a factory function returning the value we want to memoize. Like useEffect and useCallback, the second argument to this hook, deps, is a dependency array. Changes to the values passed to this array will trigger our factory function to rerun, returning a new value. If the values in the dependency array do not change, we'll instead receive the memoized value saved during the most recent execution of the factory function.

Continue Reading

React Hooks: How to Use useEffect

Of all the hooks built into React, useEffect is arguably the most difficult to understand. When I was learning React Hooks, I had just begun to get comfortable with class-based components and the lifecycle methods, such as componentDidMount. Part of the difficulty I had when learning useEffect was due to the fundamental differences between useEffect and the legacy React lifecycle methods. The best tutorials I've read on useEffect advise you to "unlearn what you have learned" in regard to lifecycle methods.

Dan Abramov has an excellent blog post on useEffect. It's very thorough, and thus a long read. This post will summarize many of the points Dan covers, and I'll cover some of the issues and solutions I've discovered while using useEffect.

First, here is the function signature for useEffect as a TypeScript definition:

type useEffect = (effect: EffectCallback, deps?: Array<any>) => void;
type EffectCallback = () => (void | (() => void));

EffectCallback is our function to execute as the effect, which can optionally return a cleanup function that will be executed when the component unmounts, or when the effect is redefined. The optional second argument to useEffect, deps, is a "dependency array". If deps is omitted, then the effect will be executed (and redefined) after every render. When deps is included, the effect is only redefined and executed if any of the values provided to the array change from one execution to the next. Consequently, providing no values to the dependency array, [], will result in the effect only being executed after the initial render. In determining if a dependency has changed, as far as I know, a strict equality comparison is performed (===). Note that arrays, objects, and functions are only equal by reference. In some situations this can be problematic. This blog post provides several solutions:
Object & array dependencies in the React useEffect Hook

Continue Reading

Create a Typed Event Emitter with Native Browser APIs

You can create an event emitter in the browser, much like the Node.js EventEmitter API. We'll be using the EventTarget and CustomEvent browser APIs to achieve this. The browser support for these APIs is good, but if you need more browser coverage, there are also polyfills available, such as custom-event-polyfill. As a bonus, we can make the events and their details fully typed with TypeScript.

class EventEmitter extends EventTarget {
  constructor() {
    super();
  }

  on<T extends EventType>(
    type: T, listener: (e: CustomEvent<EventTypeToDetailMap[T]>) => void
  ) {
    return this.addEventListener(type, listener);
  }

  emit<T extends EventType>(
    type: T, detail: EventTypeToDetailMap[T]
  ) {
    const event = new CustomEvent(type, { detail })
    return this.dispatchEvent(event);
  }
}

type EventType = keyof EventTypeToDetailMap;

type EventTypeToDetailMap = {
  'customEvent1': number;
  'customEvent2': Array<string>;
};

As we write event listeners and emitters for certain events, we get type checking for those specific events:

type checking for EventEmitter.on

type checking for EventEmitter.emit

Continue Reading

How to Set Up WSL for Development

WSL (Windows Subsystem for Linux) is a great way to gain access to a Linux OS through a command line interface. Being restricted to the CLI, WSL does require us to use Windows GUI programs. This, along with WSL being a subsystem that depends on Windows, does result in certain quirks that need to be worked around in order to utilize WSL to the fullest.

Some of these quirks to resolve include:

  • Synchronizing clipboards between WSL & Windows

  • Accessing files from both Windows and WSL

  • Choosing the right terminal to access WSL through

Due to the differences between WSL 1 & 2, the solutions to some of these issues differ depending on the version in use. I'll be focusing mainly on WSL 2 in this post, though I will cover some of the differences between WSL 1 & 2.

Installation

Continue Reading

Hot Reloading Blog Preview on Markdown File Edit

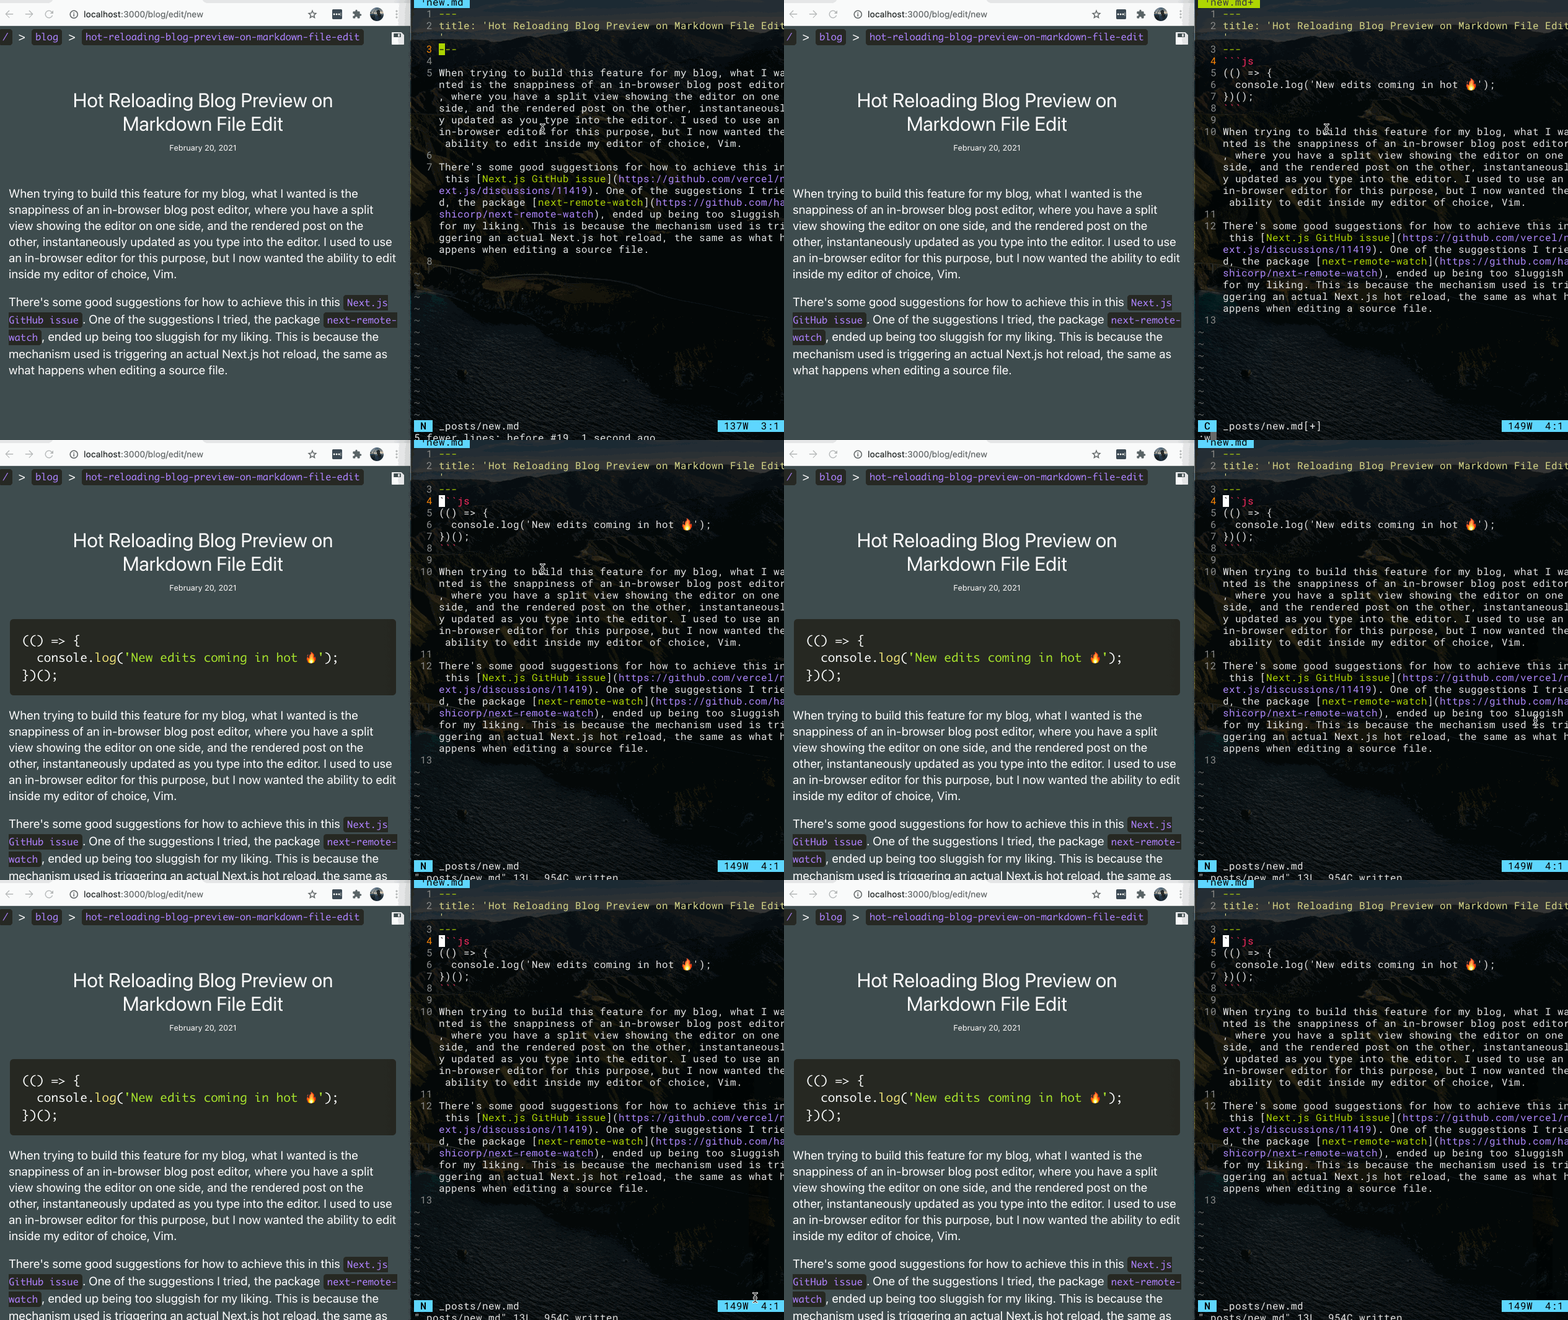
Side by side web browser and vim hot reloading

When building this feature for my blog, what I wanted is the snappiness of an in-browser blog post editor, where you have a split view showing the editor on one side, and the rendered post on the other, instantaneously updated as you type into the editor. I used to use an in-browser editor for this purpose, but I now wanted the ability to edit inside my editor of choice, Vim.

You may have noticed in the gif above that the page only updates once I save the file. If you want something that updates as you type, you could opt for an auto-save solution like a plugin specific to your editor.

Since I'm using Next.js, which comes with its own preconfigured dev server, I needed to customize the Next.js dev server to add this functionality. This isn't actually mandatory, as you could run an Express server separate from your Webpack / Next.js / other dev server, to be responsible for the file watching and WebSocket server.

For Next.js, there's some good suggestions for how to achieve this in Next.js GitHub issue. One of the suggestions I tried, the package next-remote-watch, ended up being too sluggish for my liking. This is because the mechanism used is triggering an actual Next.js hot reload, the same as what happens when editing a source file.

Continue Reading

Going Truly Serverless with Next.js Static Site Generation

With the hype of the Jamstack, and the benefits it offers, I made the switch from MERN stack to JAM stack for my blog. The most appealing benefits to me in my use case were:

  1. Improved SEO, for my site that can be 100% statically generated.

  2. Simplified architecture. No more databases and servers, just files served from GitHub Pages.

  3. Using Git as my "CMS". Switching from storing blog posts in a database, to storing them in .md files, tracked by Git.

Choosing a React Static Site Generator

Coming from a MERN app, I needed a SSG solution for React. I considered choosing between three different options:

Continue Reading

Dockerizing a MERN App for Development and Production

Creating a Dockerfile for a single service usually isn't too bad. The example Dockerfile provided by the official guide for Node.js, Dockerizing a Node.js web app, can be copied almost exactly.

However, things start to get a little more complicated when we want to:

  • Create configurations for both development and production environments

  • Enable hot reloading in development (avoid needing Docker to re-build for every change)

  • Orchestrate connecting multiple services together (relevant for any web app with a frontend, backend, database, etc.)

  • Persist data in a database between runs (with Docker volumes)

The app I'll be using as an example can be found here: https://github.com/zzzachzzz/zzzachzzz.github.io/tree/2ab6f0b10606162a57b946461c4dae74e2a295d5
I will also include the various Docker files in this post.

Edit (Feb. 15, 2021)
Yep, that's the source code for this site, at a prior commit. The site has since been migrated to Next.js with static site generation. To learn more about that, see the post:
Going Truly Serverless with Next.js Static Site Generation

Continue Reading

How to Install Vim with +clipboard with Homebrew on Linux

Note: Or just install NeoVim and this should be a non-issue.

Installing Vim with brew on OSX has worked flawlessly for me, and included +clipboard support. In my experience, working with Windows Subsystem for Linux specifically, a simple brew install vim didn't cut it, and vim --version displayed that sad -clipboard. I would prefer to use the same package manager between OSX and Linux, especially since I use a shell script for installing all my brew packages. In the past I've just resorted to installing vim-gtk to get a clipboard enabled build of vim on Linux. However, vim-gtk only yielded me version 8.0, while brew offered 8.2. I cared enough about this to open a GitHub issue and get a solution.

Installing custom formula for Vim, options not present (+clipboard) - GitHub Issue

  1. Install dependencies
    sudo apt-get install libncurses5-dev libgnome2-dev libgnomeui-dev libgtk2.0-dev libatk1.0-dev libbonoboui2-dev libcairo2-dev libx11-dev libxpm-dev libxt-dev

  2. Modify the vim formula
    brew edit vim
    Change the configure option --without-x to --with-x and add the option --with-features=huge. Save the changes.

  3. system "./configure", "--prefix=#{HOMEBREW_PREFIX}",
                          "--mandir=#{man}",
                          "--enable-multibyte",
                          # New options
                          "--with-x",
                          "--with-features=huge",
  4. Install the modified formula
    brew install --build-from-source vim

It is crucial to have the necessary dependencies installed. I tried these steps with the same formula options, --with-x and --with-features=huge, and my Vim installation silently failed to include clipboard support, prior to installing the dependencies. This is a major nuisance, and I hope to have raised some awareness of this issue, for a use case as common as installing Vim with clipboard support with Homebrew on Linux.

Continue Reading

|, >, >>, <, <<, <<<, <() Piping and Redirection in the Shell

Lately I've been learning Vim more in depth, beyond just Vim's modal editing. With that, I've been learning more about Unix and the shell. As they say, "Unix is an IDE", and Vim is just one of its tools. I'm going to keep it simple and use the terms input & output to refer to stdin & stdout, the more technically correct terms here.

program > file Redirects the output of a program to a file. If the file exists, it will be overwritten (be careful).

program >> file Redirects the output of a program to a file. If the file exists, it will be appended to (safer option).

program < file Redirects a file to be the input of a program. From what I can tell, this is rarely useful on its own, since nearly all programs which accept an input stream, also accept a file argument. Hence, these two are equivalent: cat < file & cat file. More details on that here:
How does input redirection work? - Ask Ubuntu

output | program Redirects the output of a program, to be the input of another program.
Example: echo $PATH | less
This is functionally equivalent to:
echo $PATH > temp_file && less < temp_file

Continue Reading

A Practical Guide to Learning Vim

Edit (Jan. 11, 2020): Since the creation of this blog post, I've begun using standalone Vim. My opinion hasn't changed about the learning curve, and I don't think there's an overall advantage to using Vim over using an IDE/Editor with a Vim plugin. My incentive for learning Vim more in depth is because I enjoy the process of mastering the skill. The rest of this blog post will be left in its original state. Also, the IdeaVim plugin for JetBrains IDEs is the best I have used, even better than Neovintageous.

A more fitting title might be "A Practical Guide to Adopting Vim". I'm not an advocate of Vim as an editor, I'm a fan of modal editing, of a mouse-free text editing experience. I think Vim as an editor can be great after extensively customizing it to your liking, but again, even the process of learning how to customize Vim adds even more to the learning curve. For this reason, I recommend you continue using your editor of choice... with a Vim plugin to enable modal editing.

Once someone has learned the basics of Vim's keybindings, the next step is incorporating this new skill into their daily work, to develop the skill further, and train their muscle memory. One may attempt to switch to using Vim in their daily work, and quickly find their inability to be productive. Picking up Vim as an editor involves both learning Vim, and giving up all the features and keybindings you're accustomed to in your last editor. Be it VSCode, Sublime, Atom, even picking up one of these editors and maximizing your productivity in it by learning its features and keyboard shortcuts is not a trivial task.

"But Vim emulators suck, they're not as good as real Vim. Just use Vim you filthy casual." I read too many comments of this nature in r/vim...
While some plugins emulating Vim are worse than others, this statement of inferiority should not be a barrier to entry. People should learn Vim even only at a basic level. I'm not an expert, I don't do fancy Vim trick shots in my daily editing. The most I've done is a macro, and the use case for this becomes very rare when I have multiple cursors in Sublime. I love too many of Sublime's features to give it up! That's why I feel I've struck an excellent balance of Vim features and Sublime features with my configuration. That's the beauty of this, you can keep the config you have and incrementally adopt Vim functionality, versus diving in head first.

I'm sure you can achieve a similar level of customization and features using a plugin for some other editor of your choice. My point of reference is the Neovintageous plugin for Sublime Text, so that's what I'll be covering in the remainder of this post.
Continue Reading

Multiple Inheritance in Python: Method Resolution Order (MRO)

class A:
    def __init__(self):
        print('A')

class B(A):
    def __init__(self):
        super().__init__()
        print('B')

class C(A):
    def __init__(self):
        super().__init__()
        print('C')

class D(B, C):
    def __init__(self):
        super().__init__()
        print('D')

d = D()

When class D is instantiated, what do you think will be the order of the print statements?

Python's way of determining the order in which multiple inheritance is resolved is called the Method Resolution Order (MRO). The answer to the question is:

A
C
B
D

Lets see why.

Continue Reading

Slate.js: Draft.js without the Bad Parts

Anyone who has used Facebook's open source package, Draft.js knows that while it's a powerful tool for building rich text editors, the API docs are underdeveloped, and can be very difficult to understand. The editor I wrote this blog post in was made by me with Slate.js, and before I found that, I was struggling to learn how to make Draft.js do what I wanted it to do. I don't have the expertise to go too into detail about comparing Slate and Draft, but a lot of that is covered here in the readme of Slate: Slate Principles. Instead I'll tell you about my use case: what I wanted to build with Draft, the problems I ran into, and how Slate made the process easier for me.

Given that this is a programming blog, the most important feature to me is beautiful code snippets with syntax highlighting. Like so:

// A JavaScript comment
const language = 'JavaScript';
console.log(`This is definitely ${language}`);  // This is definitely JavaScript

I had Prism.js to handle the syntax highlighting.

I needed my editor to...

Continue Reading